Today's refashion started with this dress.
As you can see, it's a little big now. The ragged bottom of the dress happened when I created a toy for the pups (see this post).
I wanted to make a shirt with an asymmetrical hemline. It needed to be short in front and longer in the back. So, I did a big cut on an angle.
Next, I pinned up each side of the dress to take it in a couple of inches.
Then, I sent each side of the dress through the machine. Since the fabric is stretch, I opted for a zigzag stitch.
Next, I trimmed off the excess fabric.
Then it was time to hem the bottom of my new shirt. I folded over the hem by about a half inch and pinned it.
I sent it through the machine to secure my new hem.
Finally, after a quick press with the iron, my new shirt was ready. Not too shabby (or raggy) huh?
Saturday, February 23, 2013
Friday, February 22, 2013
Deal Day: What next?
Hi readers. I'm sorry to be so slack, but I don't have a deal for you today. It has been an extremely busy week, and I haven't had a chance to research a good deal to post. So, I will strive to find something extremely awesome for my post next Friday. Until then, here's hoping you find a few more coins (or preferably bills) hiding in your wallet.
Thursday, February 21, 2013
Product/Service Review: Oak City Cycling Project
Ok, this review doesn't actually help me be a better domestic, but I feel I should mention this bike shop. As you may know if you follow my fitness exploits, I'm in training for a triathlon. When I started training, I had to get a bike because I didn't own one. An Internet search led me here:
I was looking for a used bike, but I wanted something that was still good quality. I emailed the guys at Oak City Cycling Project and told them about my training. After asking my height, the person helping me thought they might have something that would suit my triathlon purposes. So, I went to the shop and "tried on" a few bikes to find the one that fit me. None of the bikes that were ready were quite right, but they had a Gitane that needed a little work that fit me perfectly. He told me it would be ready in about a week, and that I would get an email to come look at it when it was ready.
True to his word, I received an email in about a week, and I went to take the Gitane on a test spin. After a quick seat adjustment, I was ready for my first ride. Instantly, I was in love with the bike. It was the most comfortable bike I had ever ridden. Seeing as how all my other bikes had been department store or hand-me-downs, I had no idea that bikes could fit so comfortably to an individual. And the fact that it is a nice looking bike didn't hurt either.
As is evidenced by this post, I'm quite pleased with my bike purchase and doubly pleased with the excellent service I received at Oak City Cycling Project. I highly recommend them to anyone in the Raleigh area who is looking to find a great bike at a decent price.
Wednesday, February 20, 2013
Recipe Review: Rock Cake
In an effort to plan my perfect wedding, I've been thinking about what cake to have. I've gone back and forth between cupcakes and regular cake. But I'm still not quite sure what I want to do. The wedding is less than 2 months away. A decision needs to be made. So, I decided to try a different kind of cake. We are having a stone theme in our wedding, and I found a cool little recipe for rock cakes.
As usual, I didn't want to make the recipe exactly as it is written. Instead of dried fruit and currants, I opted to add a little chopped white chocolate, as that is the way to make my man smile. But that was the only substitution I made. I created the recipe, and the dough is indeed very stiff. It certainly didn't pour like a normal cake batter. Instead, it seemed like a cookie or biscuit batter that I patted out to place on the cookie sheet. But the addition of the baking powder made the little cakes rise nicely. Here are a couple of pictures of my finished rock cakes.
These cakes were definitely very cookie and biscuit like. They were sweet and very reminiscent of the Bo-berry biscuits you can get at Bojangles. I actually think they would be perfect for our little offbeat wedding, but I'll get into that more on the wedding blog rather than droning on about it here. Basically, I love this as a little dessert. Since sugar cookies are my favorite type of cookie, this little rock cake is just perfect for me.
Tuesday, February 19, 2013
Clean Eating: Buffalo Chicken Baked Potato Casserole
I love buffalo chicken. I have been on the hunt for the perfect
chicken wing for years. I'm not sure I've found it yet, but I really
love indulging in these tasty appetizers whenever I feel like a little
splurge. Unfortunately, wings aren't the healthiest options being that
they are often fried and the sauce is made with gads of butter. So, I
created this dish as an homage to appetizers: tasty chicken wings and
delicious potato skins.
Sorry, I failed to get a picture of the ingredients before cooking, but I'm sure you can figure out what all these simple items look like.
Ingredients:
16 oz crumbled ground chicken
1 small onion
2 stalks celery
1 medium carrot
2 medium red bell peppers
1 tsp crushed red pepper flake
1 tbsp red wine vinegar
1 clove garlic, minced
1 tsp salt substitute
1/4 cup blue cheese
2 oz light cream cheese
1 tsp lemon juice
1 tsp garlic powder
6 oz plain nonfat greek yogurt
1 tsp Frank's Buffalo Sauce
1.25 lbs baking potatoes
1/2 tbsp extra virgin olive oil
Directions:
Preheat oven to 400.
Place red peppers on pan or foil. Place in oven under broiler and cook until skin is blackened, turning to blacken other side.
Remove from oven and place in a bowl. Cover with plastic wrap and let steam. Once pepper have cooled, remove the blackened skin and seed core.
Place peppers in food processor. Add vinegar, garlic, 1/2 tsp of salt substitute and red pepper flakes to food processor. Pulse grind into a saucy consistency. Put aside.
Slice potatoes into 1/4" slices. Add to a pot and cover with water. Boil over medium-high heat until potatoes are fork tender. Drain potatoes.
Rinse food processor. Cut celery, carrot and onion into chunks and add to food processor. Pulse grind until finely chopped. Put aside.
Add olive oil to large pan. Heat over medium-high heat. Add ground chicken to pan and brown, breaking up with wooden spoon into crumbles. Add pureed carrot, celery and onion mixture to ground chicken. Heat over low heat until mixture is heated through.
Add red pepper sauce to chicken.
Rinse food processor. Add blue cheese, cream cheese, yogurt, lemon juice, garlic powder and hot sauce to food processor. Pulse grind to combine. Add up to 1/4 cup of water to desired consistency.
Spray a baking pan with cooking spray. Line bottom of pan with cooked potato slices and sprinkle remaining 1/2 tsp of salt substitute on top of potatoes. Top with chicken mixture, then spread blue cheese sauce on top.
Cover with aluminum foil and bake for 15 minutes. Enjoy with a fresh garden salad, or delicious eaten as is.
Nutrition Facts
Serves 4
Serving Size 451.8g
__________________________________________________
Calories - 426
Calories from Fat - 146
Total Fat - 16.2 g
Saturated Fat - 6.2g
Trans Fat - 0g
Cholesterol - 113mg
Sodium - 371mg
Total Carbohydrates - 40g
Dietary Fiber - 5.3g
Sugar - 8.4g
Protein - 31.6g
---
Vitamin A - 97%
Vitamin C - 164%
Calcium - 19%
Iron - 10%
Sorry, I failed to get a picture of the ingredients before cooking, but I'm sure you can figure out what all these simple items look like.
Ingredients:
16 oz crumbled ground chicken
1 small onion
2 stalks celery
1 medium carrot
2 medium red bell peppers
1 tsp crushed red pepper flake
1 tbsp red wine vinegar
1 clove garlic, minced
1 tsp salt substitute
1/4 cup blue cheese
2 oz light cream cheese
1 tsp lemon juice
1 tsp garlic powder
6 oz plain nonfat greek yogurt
1 tsp Frank's Buffalo Sauce
1.25 lbs baking potatoes
1/2 tbsp extra virgin olive oil
Directions:
Preheat oven to 400.
Place red peppers on pan or foil. Place in oven under broiler and cook until skin is blackened, turning to blacken other side.
Remove from oven and place in a bowl. Cover with plastic wrap and let steam. Once pepper have cooled, remove the blackened skin and seed core.
Place peppers in food processor. Add vinegar, garlic, 1/2 tsp of salt substitute and red pepper flakes to food processor. Pulse grind into a saucy consistency. Put aside.
Slice potatoes into 1/4" slices. Add to a pot and cover with water. Boil over medium-high heat until potatoes are fork tender. Drain potatoes.
Rinse food processor. Cut celery, carrot and onion into chunks and add to food processor. Pulse grind until finely chopped. Put aside.
Add olive oil to large pan. Heat over medium-high heat. Add ground chicken to pan and brown, breaking up with wooden spoon into crumbles. Add pureed carrot, celery and onion mixture to ground chicken. Heat over low heat until mixture is heated through.
Add red pepper sauce to chicken.
Rinse food processor. Add blue cheese, cream cheese, yogurt, lemon juice, garlic powder and hot sauce to food processor. Pulse grind to combine. Add up to 1/4 cup of water to desired consistency.
Spray a baking pan with cooking spray. Line bottom of pan with cooked potato slices and sprinkle remaining 1/2 tsp of salt substitute on top of potatoes. Top with chicken mixture, then spread blue cheese sauce on top.
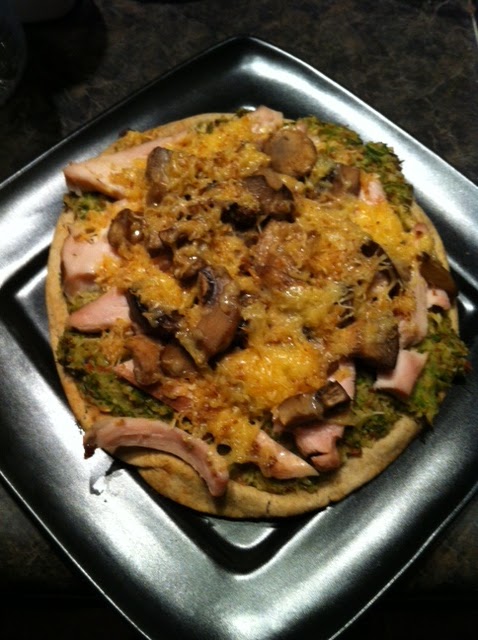
This picture was taken after I removed from oven and began sectioning portions. Just imagine without the cut marks.
Cover with aluminum foil and bake for 15 minutes. Enjoy with a fresh garden salad, or delicious eaten as is.
Nutrition Facts
Serves 4
Serving Size 451.8g
__________________________________________________
Calories - 426
Calories from Fat - 146
Total Fat - 16.2 g
Saturated Fat - 6.2g
Trans Fat - 0g
Cholesterol - 113mg
Sodium - 371mg
Total Carbohydrates - 40g
Dietary Fiber - 5.3g
Sugar - 8.4g
Protein - 31.6g
---
Vitamin A - 97%
Vitamin C - 164%
Calcium - 19%
Iron - 10%
Labels:
blue cheese,
buffalo chicken,
clean eating,
potatoes
Monday, February 18, 2013
Pet Care: Ratty Pinata
I'm always looking for ways to make my ratties lives more exciting. They tend to be a little withdrawn, and they don't much like coming out of their cage. So, when I can find ways to do something to enrich my ratties sheltered lives, I try to take advantage. Tonight, I made my rats a pinata of treats from instructions I found on this site.
This is about as far as my ratties will venture outside the cage.
So, to make a ratty pinata, I needed some treats, paper towel, string and a length of tape. I opted for corn and black-eyed peas as the treats for my rats. My rats haven't actually had these as treats, but I've read on the internet that most ratties love them.
First, I spread some corn and black-eyed peas in the middle of the paper towels. I used two paper towels for a little bit of strength.
Next, I bunched the sides of the paper towel up creating a ball at the bottom where all the treats rest. I wrapped the length of tape around the bunched up part of the paper towel at the top to secure it.
Next, I wrapped some string around the taped part, tying it into a secured knot. This string will act as the anchor to hang it in the cage.
Finally, using the long pieces of string, I tied the pinata to the top of the cage. It's still low enough that the rats can reach it when they stand on their back feet, but not so low that it's too easy for them to rip it open.
By the time I went to bed, the ratties still hadn't explored the pinata, but I'm sure it will be a great treat for them when they are ready for it.
Sunday, February 17, 2013
Tidying: Kitchen Detail
Hello, readers. I know you've been on the edge of your seat waiting to see what kind of clean up I did for my "Tidying" post this week. Well, I couldn't take it anymore. I had to clean the kitchen. I spend so much time in the kitchen cooking and creating tasty dishes. I was getting tired of having to do my magic in only 12-square inches of space. So, I had to do something to regain control of my kitchen.
I had a little help from one of my cleaning friends.
I really shouldn't like Clorox wipes because they are so hazardous, but I really, really like them. They are so convenient, and I actually feel like maybe they actually get the nasty microscopic gunk off my counters. So, after using a couple of these bad boys, I felt like my kitchen had been revamped. Unfortunately, they couldn't make a dent on the gunk in the refrigerator, but that will have to be for another cleaning day. Although, I did get rid of all the old (and for some, REALLY OLD) leftovers that were in the fridge. I managed to regain a bunch of my storage containers in that endeavor. Don't worry, I don't have any pictures of that to show you. Trust me...you don't want to see what I saw hiding in some of those containers.
So, I'm really happy with my newly cleaned kitchen. At first, I didn't think I would finish, but I managed to get it all tidied up. With Cliff's help, I even managed to get all my new pots and pans up on the pot rack. In celebration, I had dinner with Jade and Cliff at my newly cleaned off kitchen table. It was a meal prepared with some of my new cookware. FYI, the recipe for the delicious dinner will be posted soon. So far, I'm loving my new (insanely sharp) knives and my beautiful, shiny pots.
Here are the before and after pictures.
Saturday, February 16, 2013
Refashion: The Day Off
Hello, readers. I'm sorry to disappoint you with no new refashion post today. Honestly, I chose to have a lazy day today. It was snowing, and I just wanted to enjoy a relaxing day with no obligations. But I won't leave you high and dry. If you want to see some really cool refashions, click here to view the refashion show Jillian (refashionista extraordinaire) coordinated recently.
Until next time my refashion happens, here's a cute picture from the internet.
Friday, February 15, 2013
Deal Day: Vetco Clinic
As you are all very much aware, I really love my pets. And I have a lot of them, which means that vet care can get expensive. While I haven't found a way to get a better deal and save money on an emergency vet visit, I have at least found a service that helps offset some of the high costs of their annual vaccinations. Petco offers mobile vaccination clinics at some of their stores. These clinics are called Vetco, and they visit select stores about once a month. You can check out the clinic schedule by visiting this website and typing in your zip code to find the store nearest you.
If you live in a metropolitan area like I do, then you may have several different clinics from which you can choose. The good thing about this is that not all stores have their clinic on the same day of the month. So, if you miss the clinic this weekend, perhaps you can get Scraps or Muffin over to another store next weekend to get their shots.
I find the price for vaccinations from the Vetco clinic to be very affordable. I've taken my dogs and cat there for vaccines, so I've gotten prices on both types of pet. I will say that the last time I took one of my dogs in for vaccines, I dropped well over $300 for just that one dog. At Vetco, I think I spent roughly $100. That's a huge savings. It's still expensive, but if the vaccines are the same, I might as well take advantage of of a 66% savings.
Vetco is nice because it offers individual vaccines for a cost, or if your pet is due for the whole gambit of shots, you can opt for one of their all-inclusive package deals. To see what deals are offered in your area, click here. And if the package doesn't include a shot you like to get for your pet, you can still add the individual shot on after the package deal.
I haven't had any problems with Vetco, thus far. The line moves quickly, the vet techs and doctors are very friendly and not having my pet waiting at a vet's office is a little less stressful for him/her. I highly recommend saving a few bucks next time you need to get Fido's rabies tag re-upped.
Thursday, February 14, 2013
Product/Service Review: Yonanas
I've been trying to decide what I would do for my product/service review today. Then I realized that I posted a little about my new Yonanas machine on my rat sundaes post. I never finished all the praise I wanted to lavish upon this little kitchen appliance, so I figured today would be a good day to do my review for Yonanas.
I first saw this little machine when I was doing a little gift shopping at Bed, Bath & Beyond. Usually, I don't really stop to take a look at little appliances because 1) I don't have a whole lot of counter space and 2) most of the small appliances that are "invented" these days are a little gimmicky. At first, I thought this little machine fit the gimmicky description. After all, it's big selling point is that it makes ice cream out of frozen bananas. Big deal! I have a blender at home. I can already accomplish that. But I kept thinking about this little gadget, and I decided to look up some reviews on it. People seemed to really like it.
Ice cream is my one true dessert weakness. Right now, I have two cupcakes and some cookies just hanging out on my desk, and I don't feel the need to shove them in my face. But if there was a pint of Ben & Jerry's staring at me, I can't honestly say I would have the willpower to resist. So, in general, I don't keep ice cream in the house. I do sorely miss it. So, after reading the reviews and witnessing what happens to frozen fruit in my blender (it liquifies it more than crushing it into a creamy texture), I started fixating on getting a Yonanas. I didn't want to just go out and buy one. I figured I could wait to get one for Christmas. It was a long wait, but after I made my first Yonanas treat with my new Christmas present, I was very happy.
I don't think this picture really does it justice, but the texture is definitely creamy like ice cream. I haven't tried other frozen fruits in the machine, so I can't say for sure that all fruits would have this consistency. In fact, I'm fairly certain many of them would not. But the natural creaminess of a banana lends itself to being pulvarized into a soft-serve delight.
I found the picture above online. This is a great picture of the inner workings of the Yonanas. The blade is a conical shape with what looks like julienne blades. I reminds me a lot of one of the blade attachments I have on my mandolin. The banana is pushed into the black tube and pressed down with the black plunger that matches the shape of the tube. As the conical blades spin, it pulvarizes the banana into a creamy consistency that starts to ooze from the outspout (I'm just making up descriptions as I go along).
At first, I felt a little cheated by the amount of frozen soft-serve banana that came out of the machine. But once I took the machine apart, I found the banana reserve inside, which I happily scraped off to add to my bowl of frozen goodness.
My Yonanas came with a preparation book to give me ideas on other yummy frozen treats to make. But honestly, I didn't even have to consult it to know what I wanted to try first: frozen banana mixed with peanut butter and chocolate (my favorite flavor combination). I used one tablespoon of peanut butter, one frozen banana and a serving of Walden Farms chocolate syrup. That's dessert for only 200 calories. Not bad considering how crazy fattening and calorie-heavy most desserts are. Had I grated a Hershey's Kiss for the chocolate content in this dish, I would have netted 223 calories. Still not too shabby. I plan to incorporate the Hershey's Kiss in a future dessert.
Some other fruits I think I want to try that may offer me a creamy texture like the bananas do are mango, peaches and avocado. I'm a little afraid of the avocado, but I think if I use it in moderation and pair some other fun fruits with it, it could be sensational.
So, if you haven't guessed yet, I highly recommend getting a Yonanas if you are an ice cream fan like me. I don't use it every day, but whenever I feel the little tickle of an ice cream craving, it's comforting to know I have a healthy option at the ready.
Labels:
dessert,
ice cream,
product/service review,
Yonanas
Wednesday, February 13, 2013
Recipe Review: Superfoods Salad with Chicken
Today's recipe to review happened by circumstance. Yesterday, at my meeting with the Custom Built Chiks, the group leader offered Valentine's Day superfoods for us to sample. She had brought in several rosy-hued vegetables and fruits, and we learned about their health benefits. Most all rosy colored foods have one thing in common: a high vitamin C content. You can see what superfoods we sampled by going to this blog post. At the end of the meeting, there were several items we hadn't sampled, including radicchio, radishes and apples. So, since she offered, I took a couple of these items home. And since today is my recipe review day, I searched for a recipe that would allow me to use all these ingredients. I found the perfect one.
This salad recipe allowed me to utilize the radicchio, radishes and apple I had procured from the meeting. And since I had a package of Oscar Mayer grilled chicken strips, I had to do almost no cooking. The only heating I did was a toasting of some walnuts to top the salad and warming the chicken strips in the microwave. Of course, it wouldn't be a recipe review if I didn't substitute a few things. I had gotten a red delicious apple, so I used that instead of a granny smith. Also, I couldn't find walnut oil, so I just used extra virgin olive oil. I didn't have any dijon mustard, so I used spicy brown. Finally, the original recipe didn't have chicken as one of the ingredients, but I felt the meat would help make this a dinner salad instead of a side salad.
This salad was very different than the normal salads I eat. There was certainly a lot of crunch in this salad from the fresh veggies and fruit, and also from the walnut topping. But the flavor was quite pungent. Radicchio has a strong bitter flavor, and radishes tend to be spicy. Even with the sweetness from the orange vinaigrette, nothing could cut through the strong flavors in this salad. The salad was pretty good, but it had more radicchio than I like. Perhaps if the base was regular romaine lettuce with a little radicchio sprinkled throughout, it wouldn't have been quite so "in your face". I probably won't repeat this recipe, but if you really like the pungent flavors of radicchio and radishes, this one is definitely for you.
Tuesday, February 12, 2013
Clean Eating: Asparagus Pesto Pizzettes
I'm a fan of asparagus, but I can see why other people may not like it. It has a distinct flavor and texture, and the smell can be a little off-putting. But it's a green veggie that I like to have as often as I'm able to get Cliff to eat it. So, I came up with a way to hide the asparagus: make it a pesto. I'm sure I'm not the first to come up with an asparagus pesto. But it's the first time I've used it in a recipe, and it turned out nicely. Even Cliff loved this yummy meal which incorporates all the food groups and earned a B+ nutrition grade on my calorie tracking site.
Ingredients:
2 pitas (I use the Joseph's Heart Healthy Oat Bran pitas as they are only 60 calories each)
40 grams raw almonds
111 grams raw asparagus
6 oz sliced mushrooms
1 clove garlic, minced
6 oz Oscar Meyer Deli Fresh Chicken Breast Shaved Grilled Strips (this helped me save time, but increased the sodium content - if you prefer to roast your chicken, go for it)
1/2 tsp sea salt
black pepper, to taste
1/4 cup Swanson 99% fat free all natural chicken broth
2 oz smoked gouda cheese, shredded
1/4 tsp dried basil leaves
Directions:
Preheat oven to 400.
Rinse asparagus and snap off woody ends. Pat dry with paper towel. Spray a baking sheet with cooking spray. Arrange asparagus on baking sheet and sprinkle with salt. Roast for 15 minutes. After removing from oven, lower heat to 350.
Meanwhile, place almonds in a small, dry skillet. Over medium heat, cook until toasted.
Place almonds, roasted asparagus, garlic and chicken broth in a food processor. Pulse grind until a pasty consistency, scraping down the sides occasionally.
Spray a small skillet with cooking spray. Over medium-high heat, cook mushrooms until browned, adding salt to taste.
Spray a baking sheet with cooking spray. Place pitas on baking sheet. Divide the pesto mixture between the two pitas and spread over the pitas. Top with chicken, then mushrooms, then shredded gouda. Bake for 12 minutes or until cheese is melted.
Serve as is or alongside a lightly dressed salad of mixed greens. Enjoy.
Nutrition Facts
Serves 2
Serving Size 1 pizzette (345.2g)
__________________________________________________
Calories - 407
Calories from Fat - 188
Total Fat - 20.9 g
Saturated Fat - 6.8g
Trans Fat - 0g
Cholesterol - 76mg
Sodium - 1730mg
Total Carbohydrates - 20g
Dietary Fiber - 9.3g
Sugar - 4.4g
Protein - 43.4g
---
Vitamin A - 15%
Vitamin C - 45%
Calcium - 26%
Iron - 34%
Subscribe to:
Posts (Atom)


