Showing posts with label refashion. Show all posts

Saturday, February 23, 2013

Refashion: The Uneven Hemline

Today's refashion started with this dress.


As you can see, it's a little big now. The ragged bottom of the dress happened when I created a toy for the pups (see this post).


I wanted to make a shirt with an asymmetrical hemline. It needed to be short in front and longer in the back. So, I did a big cut on an angle.


Next, I pinned up each side of the dress to take it in a couple of inches.


Then, I sent each side of the dress through the machine. Since the fabric is stretch, I opted for a zigzag stitch.


Next, I trimmed off the excess fabric.


Then it was time to hem the bottom of my new shirt. I folded over the hem by about a half inch and pinned it.


I sent it through the machine to secure my new hem.


Finally, after a quick press with the iron, my new shirt was ready. Not too shabby (or raggy) huh?


Saturday, February 16, 2013

Refashion: The Day Off

Hello, readers. I'm sorry to disappoint you with no new refashion post today. Honestly, I chose to have a lazy day today. It was snowing, and I just wanted to enjoy a relaxing day with no obligations. But I won't leave you high and dry. If you want to see some really cool refashions, click here to view the refashion show Jillian (refashionista extraordinaire) coordinated recently.

Until next time my refashion happens, here's a cute picture from the internet.


Saturday, February 9, 2013

Refashion: T-Shirt Do Rag

Cliff and I have recently gotten bikes to go riding around the Greenway. I'm in training for a triathlon, and Cliff just wanted to get out and enjoy the ride. Whenever I exercise, I like to put my hair up in a bandana. Cliff had asked me if I could make a "do rag" for him that he could wear under his helmet. I had just the T-shirt that would work for this project.


Cliff loves his Marvel shirts, and he's especially fond of Spiderman. So, why am I sacrificing this shirt for head wear?


This...
And this
Unfortunately, this shirt took a tumble in the dryer with an ink pen, and these black stains are not going away. So, we got Cliff an identical shirt that he could wear, and this one became a project for me.
First, I made a diamond shaped patten on this shirt using a sharpie. I want to make sure that Spidey is front and center whenever Cliff has this on his head. 


Next, I pinned it over inside out, forming a triangle.


I ran it through the machine, leaving a small opening so that I could turn it right-side out.


This makes a really nice looking Spiderman triangle.


This is actually a little on the small side. I knew that I would need to make a couple of ties for the side. I took a couple of strips of cloth from the back of the shirt to make the ties, folding them inside out and running them through the machine.


Then I turned them right-side out and attached them to the inside of each side corner of the triangle.


After doing a quick fitting on Cliff's head, I got a feel for how small this do rag actually was. So, I decided to add a square panel to the top corner of the triangle, so that it would hang down and be positioned under the ties. I folded the raw cut edges over and ran them through the machine.


Finally, I put the square piece under the top corner of the triangle and sewed around the tip of the triangle to secure it to the "do rag".


Tada! Now Cliff has a Marvel-ous new headpiece to wear under his helmet.


Saturday, February 2, 2013

Refashion: Keeping the Toesies Cozy

Ok, I'll be honest. I'm ripping off this idea from Jillian, refashionista extraordinaire. But I can't help it. The socks she made turned out so cute that I just had to try it for myself. Check out her blog post with her cute socks by clicking here.

So, as you can probably tell, this week's refashion is socks. There's a couple of reasons:
  1. My feet get cold really easily.
  2. I'm going out of town this weekend, and I knew I wouldn't have time for a long and involved refashion.
  3. Seriously, just view Jillian's post and how cute they are, and you'll understand why I chose it.
 It all started with this.


Ok, the picture was a little dark when I took it, so I tried to lighten it. Anyway, say hello to this fuchsia sweater. It looks perfectly fine, right? Well, it's now a little too big on me, so I decided it was time to refashion it. But don't worry, I plan to do more with this sweater than just make a couple of socks. You'll see its return in a future refashion.

I'm making my new tootsie warmers from the sweater sleeves. First thing's first: I had to find out how much of the sleeve I would need to make the socks.

Part of what made Jillian's socks so cute was the button embellishment


Ok, it's not the most scientific way of measuring, but it worked. So, after I figured out where my toes needed to be, I made a cut with my dull scissors (I think it's time for a new and better pair).


Snip, pull, squeeze, snip...dull scissors are frustrating

After I got the first sleeve cut, I used it to match up the cut on the second sleeve.

Gotta have a perfect fit...like Cinderella's shoes


Then I sewed the open part where my toes go with a zigzag stitch. Just a reminder, make sure you always turn the garment inside out. I was in a bit of a hurry this morning, and I completely forgot to do this on one of the sleeves, so I had to redo my cut. The end result was a shorter sock, and I felt like a bonehead when I realized what I had done.

See how the stitch zigs and zags


After I got the sock closed up at the toes, I tried it on. It was hanging off my foot on the sides.

See the extra fabric on the left?


I definitely didn't want to be walking out of my socks, so I took in the side without the buttons by an inch or so. Just a tip, when you sew up the side, the toes will have a boxy appearance. Make sure to sew at an angle on the corner that will be next to your pinky toe since your pinky toe is shorter than the other toes. Most human feet are not shaped like squares.
Taking it in...makes my feet feel skinny


The final step is to trim off the excess. You should probably press your seams as well, but since these are just for fun, wear-around-the-house socks, I opted to skip this step.


And just like that you have a cozy warm, adorably cute pair of sweater socks, complete with trendy buttons to dress up your ankles.
Nothing like putting up your feet after a hard day.

Why hello there, cute embellishment.


Saturday, January 26, 2013

Refashion: 2 Cowls to 1 Dress


I'm so excited. I finally got my sewing area cleaned up and my new sewing machine set up for my refashions. And I had a great idea for my first (sewing machine) refashion. First, take a look at my brand new toy.


Isn't it pretty? It's got so many cool buttons. I can't wait to get to know all of them. I actually had to read the instruction manual to make sure I understood it before I launched into my project. It's a bit different from my old machine, but it didn't take us long to become good friends. I got it threaded and practiced on one of Cliff's shirts that I needed to stitch. It works great, and I was so happy to begin my refashion. So, here is where my project began.


Apparently, I have a thing for shirts with cowl necks. But because of my weight loss (yea!), these shirts are now too big for me. It's funny because I actually just wore the purple shirt this week. But when I noticed it kept hanging over my shoulder, I knew it was time to retire it. But instead of donating it, I decided it would  make for a beautiful refashion.

First, I started with the black shirt. I needed to sew through the shoulders a little so it wouldn't hang on me so much. I took in each shoulder by 2 inches.


Then I made it permanent with a straight stitch through my machine.


Next, I had to take in the sides. I pinned each side in by 2 inches.


Then, once again, I sent it through the machine. Since this material is quite stretchy, I opted to do a zigzag stitch to allow for a little give.


After I got the shoulders and sides taken in, I had to trim off all the excess.


Next, it was time to take care of the pink cowl shirt. My plan was to turn this whole ensemble into a dress, so the pink cowl shirt was going to become the bottom of the dress. First, I chopped off the top part of the shirt from the bottom, right under the sleeves.


Then I placed the raw cut edge of the pink shirt against the finished edge of the black shirt with the inside of each shirt touching and pinned them together.


Next, I sewed these two pieces together to create one long dress. Again, the fabric is stretchy, so I once again used a zigzag stitch for it.


After I connected the bottom of the dress to the top of the dress, I got out my trusty (rarely used) iron to press all the newly sewn seams.


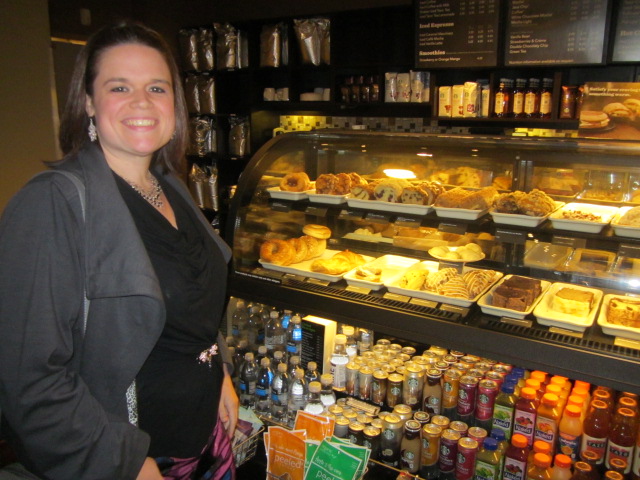
I tried on the dress, and I wasn't completely happy with the way it was hanging. I didn't want to put on a sash because I wasn't sure that would give me the effect I sought. So, I grabbed my dragonfly brooch to make a gather around my midsection. After getting dolled up and putting on some jewelry and boots, I was ready to show off my new dress.


I was all dressed up and ready to hit the town. So, Cliff and I opted to go to dinner at Edwards Mill Bar & Grill.


After a slightly disappointing meal, we stopped by Starbucks so I could get a skinny mocha. Luckily, I had the willpower to avoid getting a tasty-looking pastry from their display case.


I'm happy with how this dress turned out. I wasn't really sure it would work out, but I believe the dragonfly brooch saved it.